Java.sql.sqlexception Got Minus One From a Read Call Oracle
25 Apr 2014 Update: This guide has been originally written 2 years agone describing Oracle 11gR2 DB installation. Now it has been revised for the latest Oracle 12cR1 DB.
Introduction
Installing Oracle DB on whatever Mac OS version is non an like shooting fish in a barrel task. Official support was dropped from 10g onwards around the early on days of Mac Os X and since then at that place has been endless questions online of how to go well-nigh after versions like Leopard (ten.5), Snow Leopard (10.6), Lion (10.7), Mount Lion (ten.viii) or Mavericks (10.9).
I have yet to observe a consistent resources online of how to natively install the database and I accept too tried my hands on binaries compilation and bundle transfers forth all the previous versions with various, inconsistent results. I have to admit that this long-winded procedure gets too complicated for my gustatory modality and patience.
The people at Oracle have acknowledged this problem and have provided a neat solution abstracting all the complicated noise, packing upwards all the required tools and needed configurations in a unmarried prototype file readily to exist hosted as a VM in VirtualBox.
This is old news and although VirtualBox is well documented I oasis't once more found a single resources that is describing the process from top to bottom for my setup which is a Macbook Pro using WiFi therefore this detailed tutorial.
* General Note: As the creators suggest Oracle XE should be used for testing purposes simply. Too the bulk of passwords on the VM take been setup by default to oracle and should be changed for obvious security reasons.
Step 1: Getting VirtualBox
This is as simple as any other installation on a Mac. All we accept to do is grab our x86 version (bold an Intel CPU) for Mac from the official download folio.
25 Apr 2014 Update: Currently VirtualBox is @ version 4.3.10 and doesn't seem any different.
Stride two: Getting the VM file
This is the download folio and the download instructions are clear. The ova VM file is big ~4G so amend start the download process on a browser that has an integrated download managing director similar Firefox if you lot have a deadening connection or are oftentimes experiencing dropped connections.
Apparently this VM has been initially created for a developer'due south workshop but gets often updated with the latest and greatest of Oracle Customer, Oracle SQL Programmer and other tools. Various walkthroughs and other interesting tutorials are loaded-upwards on the VM pending to be discovered but all we intendance about is the Oracle 11gR2 DB which will exist by default up and running when the VM is loaded into memory.
25 Apr 2014 Update: This is still the go-to identify to become the OVA file. The divergence is that the size of the file at present spans ~ 5.22GB and has been prefixed with "OTN_" in the name. And of class it sports the latest Oracle 12cR1 DB along with the latest SQL Programmer four.
Step 3: Installing the Guest VM
Our host OS is apparently Mac Os and the guest VM is Oracle Linux v which is a branch off Ruby-red Chapeau Linux.
From the VirtualBox Bill of fare we select File > Import Appliance
Then nosotros make it point to the VM file we've but downloaded:


25 Apr 2014 Update: In the picture show above equally mentioned in the previous section the name should be "OTN_Developer_Day_VM.ova" and the size ~ 5.22GB.
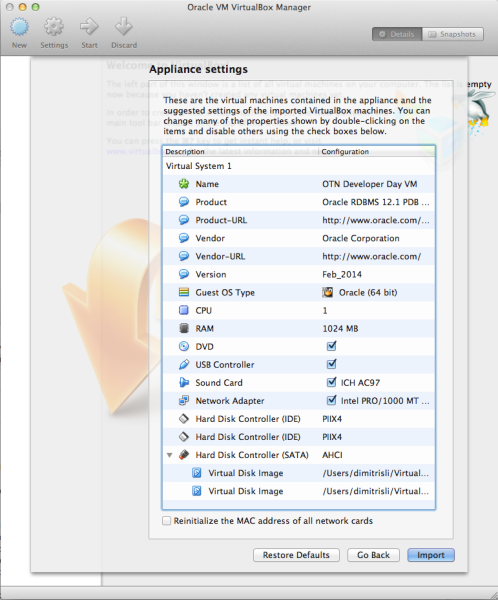
Click hither for an older version of the picture higher up installing version 11gR2
After the import gets completed we are ready to get-go the VM:

Click hither for an older version of the flick higher up installing version 11gR2
Step 4: Starting the VM
Starting up the VM is as easy every bit inserting oracle/oracle when we are prompted for username/password:

Click here for an older version of the picture above installing version 11gR2
When the Os boots up nosotros are ready to get:

Click here for an older version of the picture to a higher place installing version 11gR2
Step 5a: Making Oracle DB visible – Internet Connectivity
On the top right of the VM in that location should be an icon denoting Internet connectivity on the VM. If past default it is disabled information technology might need a kicking to connect and as long as your Host OS has Net connectivity it will connect without issues:


Footstep 5b: Making Oracle DB visible – Firewall
This is a tricky step that nosotros didn't need to perform 2 years ago on that flavor of OracleOS that was hosting 11gR2.
Basically the OracleOS Firewall is activated past default. Then we accept ii solutions:
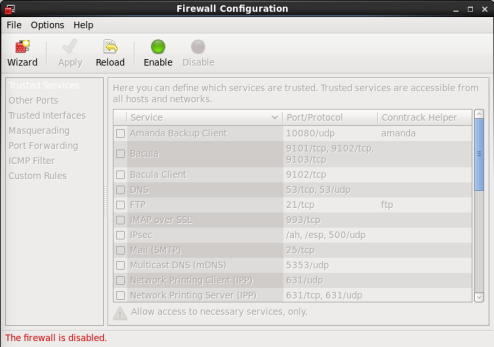
Solution 1 – Switch-off the OracleOS Firewall birthday
The Firewall is attainable via System(top left)>Administration>Firewall
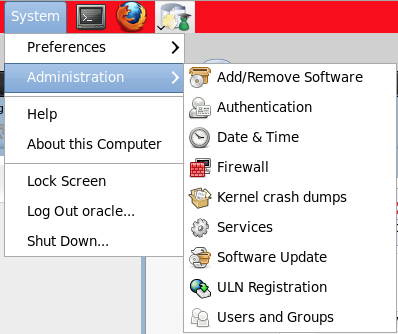
On the Firewall Configuration panel click on the Disable button and so the Firewall disabled should wait like this:
Solution 2 – Allow port 1521 in Firewall to be accessible remotely

Footstep 5c: Making Oracle DB visible – VirtualBox PortForwarding
Past default VirtualBox > Devices > Network Adapters is attached to an internal NAT that should hopefully requite you access to Cyberspace.

My setup is a MacBook Pro that is getting Internet via WiFi therefore I've tried to get the Bridged Adapter via WiFi to piece of work that is initiating a more direct connexion between the Host and Guest VM but to no avail. I've tried several things suggested out there such every bit reducting the MTU to 1496 or downgrading to IPv4 just without luck.
The solution lies in the Port Forwarding selection under the Network Adapters flick above:

Here we define external requests coming from localhost (127.0.0.1) to the standard Oracle advice default 1521 TCP port to be forwarded to our Oracle VM with IP accost 10.0.2.15 on the same port. The IP of the Oracle VM can exist institute by issuing ipconfig control on the terminal (3rd line, inet addr):

Click here for an older version of the picture higher up installing version 11gR2
Stride 6a: Testing external connectivity – via Telnet
From the Host Bone (Mac OS X Mavericks) we tin can test that nosotros tin can connect to localhost at port 1521:

Stride 6b: Testing external connectivity – via IDE
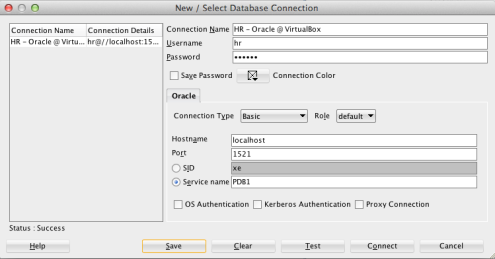
Besides past using IntelliJ (thirteen.1 in this example) datasource capabilities we can successfully connect to the Oracle's Sample Hr database (username: hr, password: oracle):

Click hither for an older version of the picture above installing version 11gR2
25 Apr 2014 Update: Note the correctconnection jdbc url:
jdbc:oracle:thin:@//127.0.0.ane:1521/PDB1
In prior version 11gR2 it used to be (simply this does not work anymore):
jdbc:oracle:thin:@//127.0.0.ane:1521:orcl
Footstep 6c: Testing external connectivity – via SQL Programmer
SQL Programmer 4 @ Mac OS 10 Mavericks:
Click hither for an older version of the picture above installing version 11gR2 sporting SQL Developer iii at the time
Conclusion
That'southward a quick, clean and bulletproof way of having the most recent Oracle DB running on a Guest VM not only on Mac OS but on any Bone.
PS. If y'all have a Synology NAS like I do, y'all might want to bank check out my detailed tutorial on how to host the VirtualBox VMs on the NAS and connect to information technology via the supported iSCSI protocol past VirtualBox clients installed on whatever home/work computer.
dicksondionsiouseve.blogspot.com
Source: https://dimitrisli.wordpress.com/2012/08/08/how-to-install-oracle-database-on-mac-os-any-version/
0 Response to "Java.sql.sqlexception Got Minus One From a Read Call Oracle"
Post a Comment